Last updated on February 27th, 2022 at 09:06 pm
It started one night when my wife mentioned Jupiter was going to be in conjunction in the Florida sky in June 2019. I ended buying a telescope that night on Amazon which was a total impulse buy and lack of research started me down a path of multiple telescopes but ultimately got hooked on looking at the stars. Reading many late nights on CloudyNights I was intrigued by the guys taking pictures of amazing Deep Sky objects right from their own backyards. This can be an extremely expensive hobby and wasn’t quite sure it was for me so I wanted to dabble and try it out. Focused on a simple integrated setup that would not break the bank, I tried to reuse as much of my telescope gazing equipment as I could and bought used equipment on eBay and Astromart when possible to try out Astrophotography.
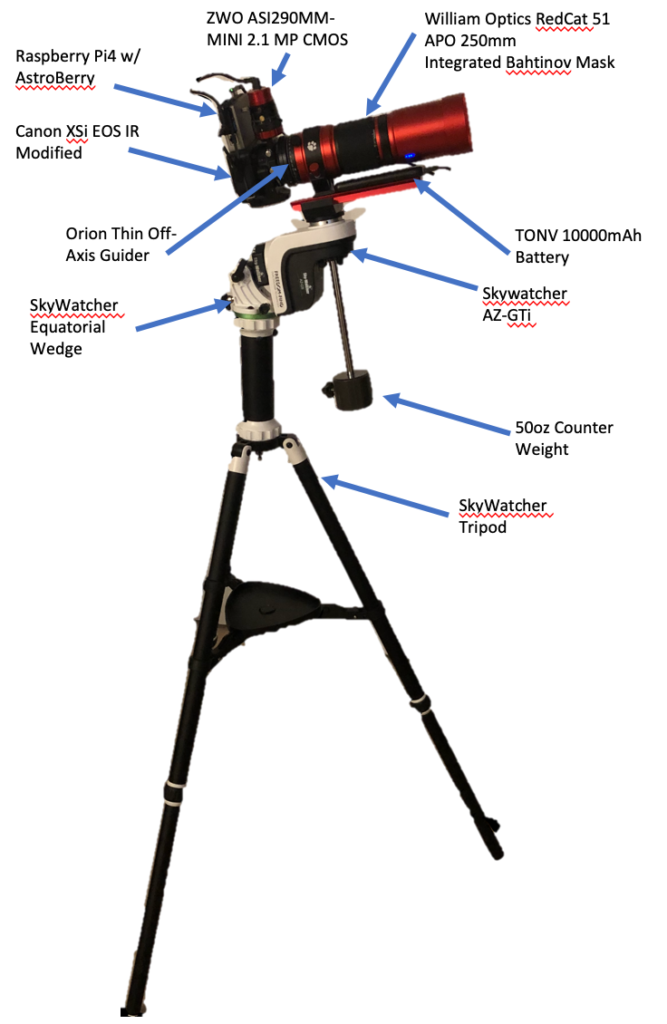
Astrophotography is can your our own portable time machine to gaze millions of years into the past and see some of the most beautiful objects in nature, we just need a little help. The longer you can keep the camera steady the more light you can collect and the farther back in time and deeper in to space you can gaze. It is not easy but it can be done on a budget and tons of your time to integrate the systems needed to counteract the Earth’s rotation and stare at a small point in the sky for hours at a time. Things like Raspberry Pis have evolved and can be used as a closed loop control system to achieve unprecedented accuracy. Things which were reserved for deep pocket books or government agencies are now open to our backyards. Geared with this equipment I intend to inspire our young ones to look at the stars with those bright imaginations and lead them down a path of continuous learning. Most of the time unless you are at a really dark sky you cannot see what you are taking a picture of with your Naked Eye. As cool as this sounds what nobody tells you about taking pictures of the stars comes long nights and poor sleep schedule. For those with children and busy work schedules, it can be hard to maintain interest in the hobby and keep going. This is especially true in those first weeks and months which will be very frustrating as you learn your way up the curve and the best you get are blurry, streaky, uninspiring images a result. I have experimented with quite a few things but the main goal is to save my sleep as I continue in the hobby. I have accomplished this by getting a simple and automated setup. You will find my foundational design elements that allowed me to achieve this below.
What I am starting from includes:
- SkyWatcher AZ-GTi goto mount with tripod
- Onesky 130mm telescope
Hardware Requirements
- In total we want the hardware payload to be less than 7lbs. The AZ-GTi can only handle 11lbs and you don’t want to go over 50-75% capacity for Astrophotography on your mount.
- We want all the hardware to be powered from Lithium Ion battery so we are not lugging AC power cords around in the dark
- We want to be able to hit the sack early enough so we can still get some sleep and be ready for those kiddos bright and early in the morning. So we need about 4 hours of juice on any given night.
- We want as simple setup as possible. A typical night will start at 7pm and I want to be in bed by midnight. This hobby will allow you to get as complicated as all possible but I want as simple a setup as I can achieve with good cable management. Goal was to have 4 cables.
- We want the setup to be portable so that we can take the kids on a camping trip to a dark sky site. Goal is to make all the equipment fit in a carry on size bag.
Software Requirements
- We need the software to support Polar Alignment via plate solving for very fine polar alignment
- We need the software to support aperture and shutter control of the selected Main Camera
- We need the software to support a secondary Guide Camera to perform a closed loop tracking of star field to allow long exposures of the Main Camera
- The software needs to support the Skywatcher Az-GTi control via INDI WiFI interface. This mount is being reused from from my telescope setup.
- We need the software to support WiFi HotSpotting so we can use this at a remote dark sky site one day
- We need the software to support connecting to our home network for backyard imaging
- We need the software to support automated operation so that we can image from the comfort of the house
Summary
- My expenses so far have been just over $2,000.
- Overall I can achieve about 60 seconds subs but anything longer is pretty much unacceptable and those subs are largely tossed.
- Polar Alignment is a bear with this system and the initial setup of this system can take around 90 mins to get to a point where we can start collecting images.
- I have bought some stuff from eBay but I have had more success on Astromart being a smaller auction site focused on astronomy and astrophotography equipment.
- I used Amazon, Agena, and HighPoint Scientific to fill the rest
- CloudyNights is a great resource for searching for components to meet those design elements above
- AstroBackyard has a lot of great information that keep me moving forward

Cost
| Canon Xsi w/ IR Mod | $145 |
| ZWO ASI290mm | $299 |
| RedCat | $728 |
| OAG | $119 |
| Helical Focuser | $59 |
| Raspberry Pi4 | $62 |
| Raspberry Pi4 Sdcard | $12 |
| Raspberry Pi4 Al Case | $13 |
| Az-Gti | $373 |
| Battery | $16 |
| Eq Wedge | $55 |
| Canon Battery | $16 |
| Cables | $12 |
| Magnetic USB-c Adapter | $25 |
| Counterweight | $25 |
| ADM Saddle | $55 |
| Total Cost | $2,014 |
